
(I'm gonna call it "done". If you read it while it was "in progress", you might wanna start over)
Hello, fellow bloggers, and readers.
Recently, I was in WizTalk Chat at ConnectX , and it was brought to my attention that graphics are a "learning opportunity" for some of my fellow bloggers. So, I will attempt to detail the simple methods I use, (cheap and easy), so that other bloggers can , at their discretion, employ them on their respective blogs. Just about every graphic on this blog was done, using these methods, (or variations thereof). Even the "Tenure for Dworgyn" picture is composed of 5 "layers".
What is a "layer"? Think of a stack of 5 transparent pancakes. Each one has a single chocolate chip, placed differently than the other 4 pancakes. However, when you look straight down at the stack of pancakes, all you see is the 5 chocolate chips, regardless of which pancake it is on.
Now, instead of looking straight down, think of a picture as a stack of pancakes glued to a wall. Each Pancake "layer" has a different part of the picture, but when viewed all the picture "elements" (Chocolate chips), all mesh into one picture.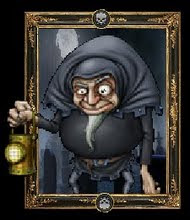

Layer list for "Tenure for Dworgyn" picture:
1)Background layer(lowest): The black. There is nothing further back than this.
2)Next highest "pancake": graveyard picture.
3)Next highest: Dworgyn's body.
4)Next: The frame.
5)Highest: Dworgyn's hand and lantern,(which gives the "out of picture" effect), and the Death School logos
2)Next highest "pancake": graveyard picture.
3)Next highest: Dworgyn's body.
4)Next: The frame.
5)Highest: Dworgyn's hand and lantern,(which gives the "out of picture" effect), and the Death School logos
First , we need a powerful graphics program.
No, I'm not talking Photoshop, Gimp, or any other "pay to use" kind of things. It's a program that you most likely already have...MS Paint.
MS Paint? Are you kidding?
No, I'm not. It has all you need for "collage" style graphics. And it's free. The key is to think in "layers".
For this example, we're going to duplicate the "W101 fanblog" piece off of the Homework Banner(which, in iteslf is a graphic built up with several layers. We're gonna "deconstruct" it, and build up another):
 Now, the easiest way is to right click the picture and "save as..." to your preferred picture folder. Another way to capture a graphic is the "Print Screen"(PrnScr) option, which copies EVERYTHING you're looking at. If you do this, you'll have to "Select"> cut, and paste to get just the graphic you want. It's a harder method, but sometimes the only way.
Now open up your paint program (Usually under Programs>accessories>paint), and open up your saved graphic. It should look like this:
 Now, we want to cut away everything we don't need. Select your "Select" tool (the dotted box), and put a box around what you want to KEEP.
 With that selected, go to "Edit" then select "cut", all of a sudden, you get a blank space where your selection was. Don't worry, it's fine. now go "File" Select "New" (choose "Don't save" on the pop up). You now have blank canvas. Good! Select "Edit" then "Paste", and viola! here's your work piece!
 Now comes the "fun" part. This is where the "pay for it programs" shine, but since we're doing "free", we have to do a bit of "leg work" ourselves. Now, pixel-by-pixel, we have to cut away everything we don't want around the picture. You can "select" some of it, but a lot of it will be done with the line tool, paintbrush, and a lot of "zoom".
I usually "select" and "cut" most of the bulk stuff away, "Line" tool to carefully outline what I want to keep, and paintbrush the rest. Here's a "work-in progress", cleaning up the image. I use green, (for reasons I'll explain later).
 So, after some careful "painting" around the graphic, we'll have something like this:
 As you can see, I used the "Fill with color" tool, so now everything I DON'T want is green.
By now, the graphic is far too large, so feel free to "Select" around what you want, and use the "Cut", File>new, "paste", method to reduce the file size.
Now is a good time to save your work. Make sure you name it something you'll remember.
* A quick note about saving your graphic files, for working on later. Not all MS Paint programs are created equal. Some of the later versions will let you save a .JPEG or .JPG files. While that format is fine for finished work, I *strongly* recommend you save your unfinished work as a Bitmap (.bpm) file, early on while learning "the process",because it's paint's native format, and easier for you to work with in MS Paint. Once a picture is a .JPG file, it's significantly harder to manipulate. Also, when saving a JPG to BMP, you can expect some color loss, and mild graphic degradation, but it shouldn't be too bad. Try to avoid "misty" or "sparkly" jpg's, because they really translate poorly into a 256 color bitmap. Or, if you REALLY want that sparkle, go ahead and save as JPG, just know that it's gonna be more work, so rock on!
Once that is done, Select "New".
We need something to put the graphic we just edited on. I'm going to choose a random picture from the internet: (Okay, so it's not really so random...sue me.)
 (Okay, so it's not really so random...sue me.)
Now, we need to save this graphic, but before we do, we need to expand the canvas a bit, to give us some workspace. You should notice tiny little blue dots, centered on the bottom, and the far right of the canvass. If you mouseover them, your cursor will turn to an arrow, allowing you to expand or contract the canvass. We need ours just a little "taller", :
 Now we save this pic, and open up our previous one, the "fanblog" part we edited down so carefully. "Select" as little of the pic as you can, open the "Diary of a Wizard" pic, and "Edit>paste" Bring it down into your blank "work area", it should look like this:
 Now, this is the "cool" part. Remember I told you I used green for a certain reason? It's because in this picture, green isn't a necessary color. So, take your "fill with color", and fill all the green with WHITE paint. Then, select white as a background color (right click it on the color palette), and make sure you have "the invisible button" selected:Ready? This is where the magic happens. Use your "select" tool, surround your "fanblog" element, and now MOVE your graphic element OVER the "background" picture. Let's place it in the upper right hand corner, shall we?
Caution! Danger, danger, Will Robinson! Once you "unselect" your element, it will be permanent ! You will not be able to adjust the position of your element. Your only hope is the Edit>undo option. Since this is MS Paint, not Photoshop, we cannot manipulate layers, at will. If we mess up too bad, we have to start all over again! So, "measure twice, cut once".

Once you're happy with the placement, you can deselect it (click anywhere, really), and POOF! You've now made your first 2-layer picture! Gratz!
Anything else you want to add to your graphic? Just repeat those same steps. Each element has to be processed individually. Also note, TEXT is considered a graphic element, once it has been typed! Don't think of it as "words" but a "picture of words". You can type up your text in your "workspace", and "select" and move it to your graphic, just like any other element.
So, just for example's sake, I will "fast forward" through our example picture, to a "finished" product:

Note, that by repeating the above steps, we added the URL , Fallon's pic, and her speech bubble. Everything is a separate element, and some elements are made up of layers, themselves.
This example was done in .bmp format. Not as shiny and glitzy as doing it all in .jpg, but hey, whaddya want? it's only a "cheap and cheerful" example.
So, there's my secret to blog graphics. The rest is up to you, and your creativity. Many things in life are composed of layers, not just pancakes and pictures. Look around you with new eyes, and see the world again for the first time.
Whew! A 2 day post! Graphics lesson AND a plug for ConnectX? Autumn, you need to rest!
4 comments:
Ooh, ooh, ooh - I can't wait to see wait you do next. I'm glad our chat room last night was filled with bloggers and fans alike. You are welcome to drop by anytime!! It seems like the ideas just poured out with all of us together.
Cool! Thanks SO much! I didn't know that! I really wanted to learn how to take a picture of what your looking at and edit it on to something else. I thought you did it with photoshop, but then you explained everything was made by ms paint.
hi i am trying to do this to make a blog header but when i try to fill the pic with white it does something weird. do you have a email so i can show you whats happening?
Thanks,
christo skywalker
I'm going to guess that it's a "fill" issue. That's because if you're trying to fill a .jpg, it doesn't work, only when it's in raw, unsaved paint format., meaning that area you're trying to fill has to be manually painted/erased.
Post a Comment